Using the Order Workflow (Transfers & Consumption)
The Order Workflow is used when you want shop staff to pick, prepare, and stage items before the transaction is finalized.
This workflow is designed for existing stock only — meaning:
Transfer and Consumption are the only allowed transaction types.
Purchase and Initial Stock must be done through Immediate Record (see Guide 2).
1. Ways to Start an Order Workflow
You can begin a new order request from several places in the system.
A. From the Dashboard
Click + New Order / Transaction.

B. From Any Item Page
When viewing an item, click the New Transaction button in the top-right corner.

2. Opening the Order Workflow Screen
After choosing New Order / Transaction, you will see the workflow selector at the top.
Click Order Workflow.

This opens the Order Request screen.
3. Order Configuration
At the top of the Order Request screen, you’ll see configuration options.
Order Configuration Includes:
Shop staff will pick, prepare, and stage items.
The requester will be notified when the order is ready.Pickup Instructions (optional)
Useful details for shop staff.Requested Ready Date & Time (optional)

Existing Orders
You may choose:
Add to an existing open order
(If an order is already in progress)
OR
Create a new order when this cart is submitted
(Default behavior)

4. Adding Items to an Order
Scroll down to the Transaction Cart and click:
+ Add New Transaction
This opens the transaction entry section.

4.1 Select an Inventory Item
Use the dropdown to select the item being moved.
If the item does not exist in the catalog, click + Add New Catalog Item.
After selecting an item, system will show:
Basic Info
Additional Data (if any)

4.2 Select Source Location Using Available Stock
If the item exists in multiple locations, they are displayed under:
Available Stock Locations (Click to Select as Source)
Click a location to use it as the source.
When selected:
The source location locks
Source Cost Center + Major/Minor codes auto-fill

4.3 Choose the Transaction Type
Because Order Workflow uses existing stock, only:
Transfer
Consumption
are available.


Note: Purchase and Initial Stock must be done via Immediate Record.
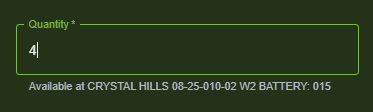
4.4 Enter Quantity and Required Fields
Enter the quantity to move or consume.
Additional fields include:
PST amount (auto-calculated based on history)
Destination cost center
Storage location (either choose existing or add new)
Comments (optional)
4.5 Review Transaction Preview
Before adding to the cart, the system provides a clear summary of the planned movement.
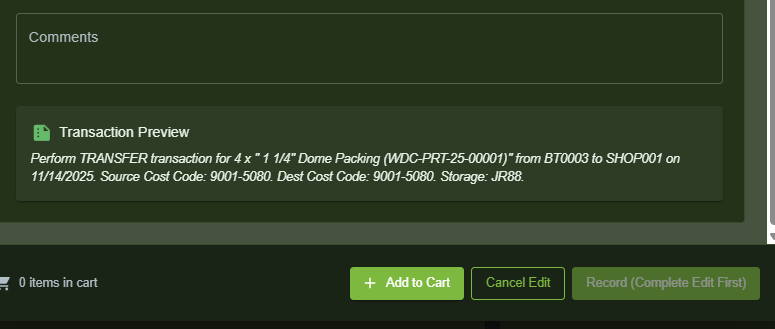
Click Add to Cart to include the item in the order.
5. Submitting the Order
When at least one transaction is in the cart, click:
Submit Order
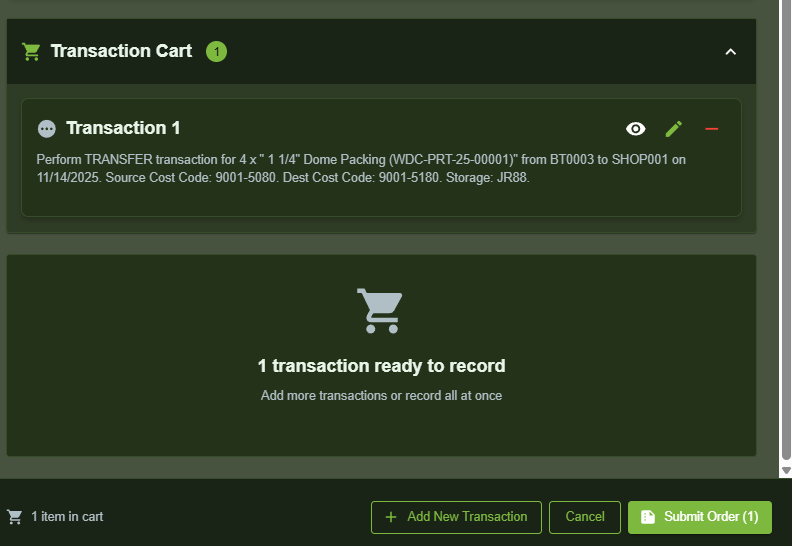
Submitting the order:
Creates a new order
Sends it to the Orders Board
Allows shop staff to begin fulfilling it
6. The Orders Board
Navigate to:
Inventory Management → Orders
This screen shows all open and historical orders.


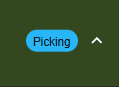
6.1 Order Statuses
The workflow moves through these stages:
| Status | Meaning |
|---|---|
| Pending | The order has been submitted and is waiting for staff to begin picking. |
| Picking | Staff are actively gathering the items. |
| Ready | Items are staged and ready for pickup or delivery. |
| Fulfilled | The order was completed — inventory is updated. |
| Cancelled | Order was voided before fulfillment. |
6.2 Actions for Staff
Inside an order, the right panel shows available actions.
When picking starts:
Click Start → Order becomes Picking.
When items are staged:
Click Ready → Order becomes Ready.
When items are finalized:
Click Fulfill Order → Inventory updates and transaction is recorded.
Undo
Reverses the last step (picking or ready).
Cancel
Stops the order if no longer needed.


7. What Happens When an Order Is Fulfilled
When shop staff clicks Fulfill Order:
The system creates the actual Transfer or Consumption transaction.
Inventory quantities are updated immediately.
The order is marked Fulfilled in history.
8. Editing or Cancelling an Order
Orders can be edited or cancelled from:
The Orders Board
The Order Detail panel
Was this article helpful?
That’s Great!
Thank you for your feedback
Sorry! We couldn't be helpful
Thank you for your feedback
Feedback sent
We appreciate your effort and will try to fix the article