Woodland Asset Management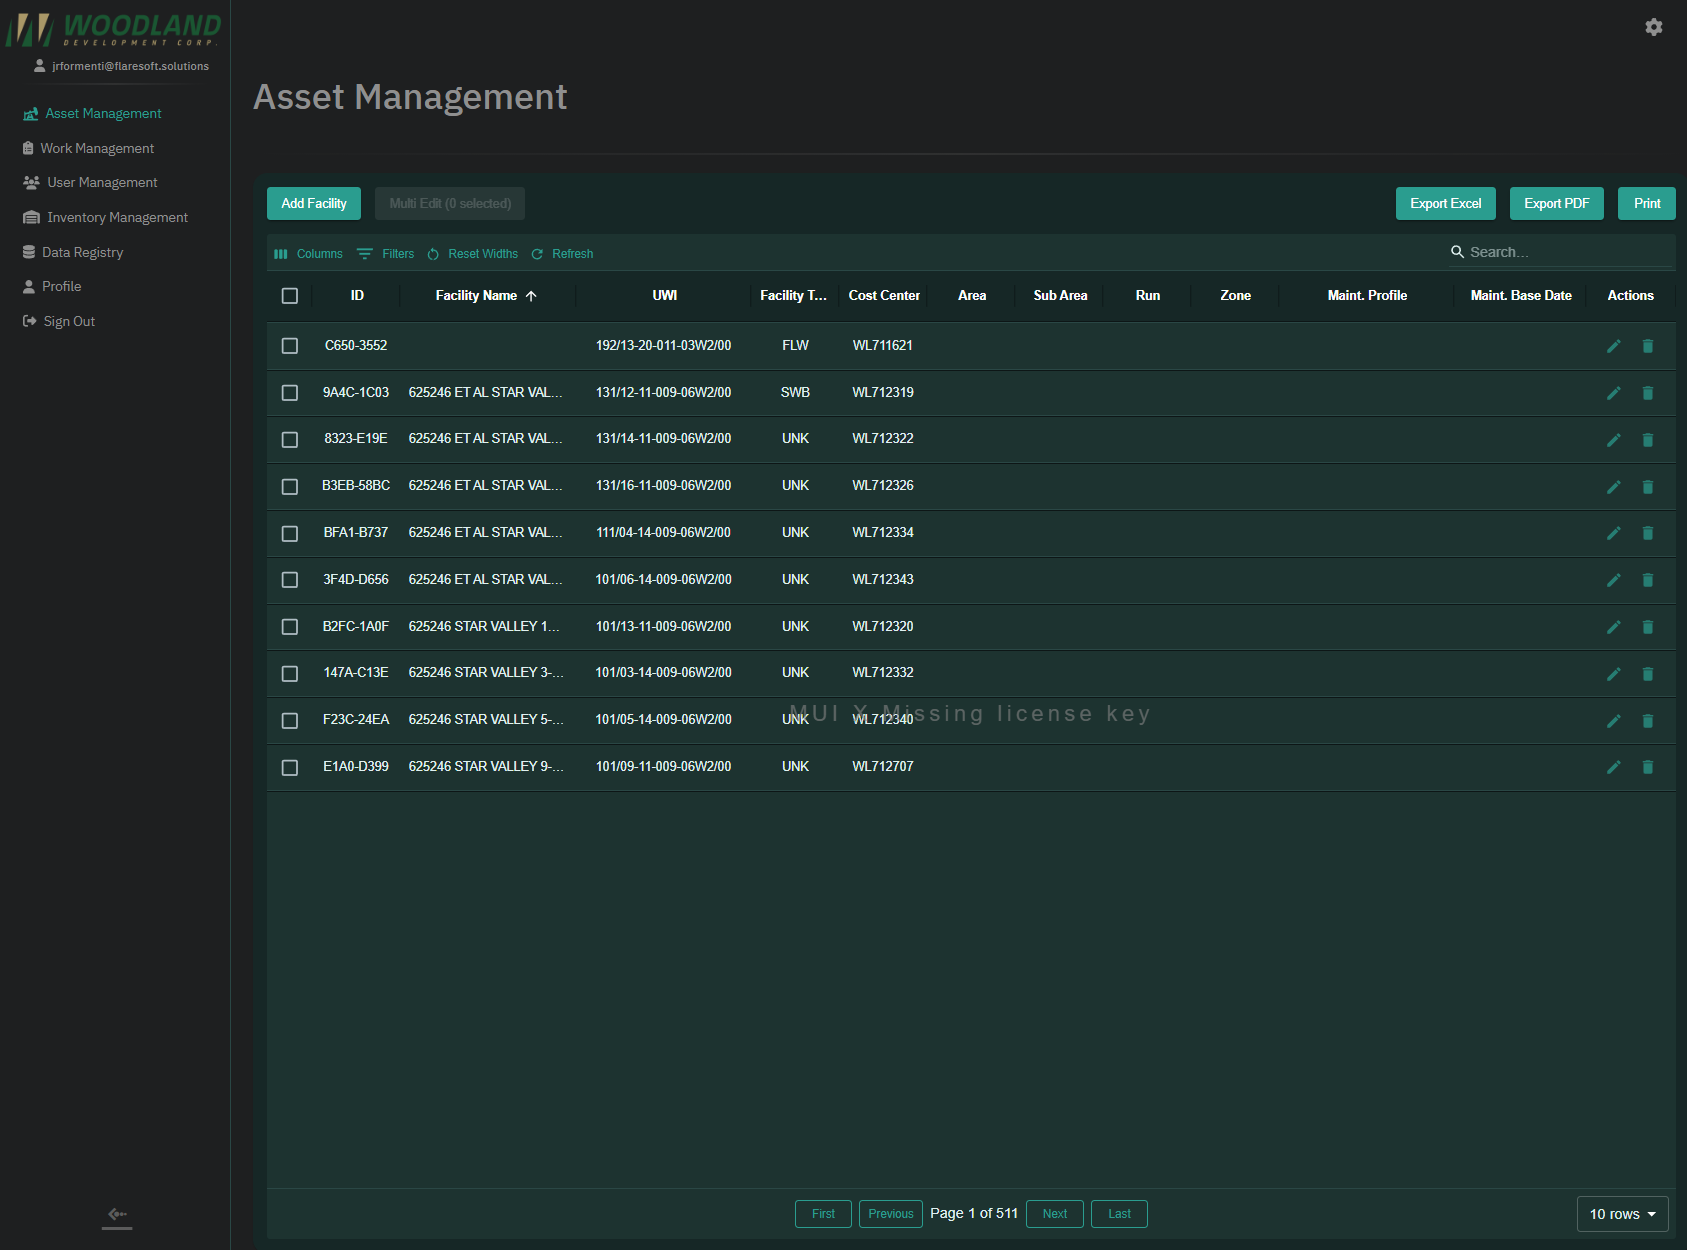
Overview
The Asset Management section is the central hub for managing and tracking facilities within the Woodland platform. It provides tools for creating, editing, and organizing facility data in a streamlined and user-friendly interface.
Key Features
Facility Table:
- Displays key details for each facility, such as:
- ID
- Facility Name
- UWI
- Facility Type
- Cost Center
- Area
- Sub-Area
- Run
- Zone
- Maintenance Profile
- Maintenance Base Date
- Displays key details for each facility, such as:
Action Bar
The Action Bar at the top of the Asset Management table provides tools for managing and customizing your facility data. Each feature is designed to streamline workflows and enhance usability.
Add Facility

The Add Facility feature allows users to create new facility entries by filling out a comprehensive form with relevant details. This is essential for managing and tracking facility data efficiently.
How to Access
- Navigate to the Asset Management section from the sidebar.
- Click the Add Facility button located in the top action bar.
- A pop-up form titled Add New Facility will appear.
Add Facility Form Fields
The form includes several fields that must be filled out or selected. Fields marked with an asterisk (
*) are mandatory.
Facility Type (Required):
- Select the type of facility from a dropdown menu.
- Example: BAT, FHR, SAT.
Facility Name (Required):
- Enter the name of the facility.
- This field is crucial for identification purposes.
UWI (Unique Well Identifier):
- Optional field for entering a unique identifier, if applicable.
Cost Center (Required):
- Specify the cost center associated with the facility.
Area:
- Choose the area where the facility is located from a dropdown menu.
- Dependency: Both Sub-Area and Run require an Area to be selected.
Sub-Area:
- Select a specific sub-area within the chosen Area.
- Dependency: Requires an Area to be selected first.
Run:
- Input operational run information associated with the facility.
- Dependency: Requires an Area to be selected first.
Zone:
- Select the geographic or operational zone for the facility.
- Dependency: Requires a Run to be specified first.
Maintenance Profile:
- Define a maintenance profile for the facility, if relevant.
Maintenance Base Date:
- Set a maintenance base date using the date picker.
Multi Edit Facilities


The Multi Edit feature allows users to update multiple facility records simultaneously, saving time and effort when managing large datasets.
How to Access Multi Edit
- Select the facilities you want to edit using the checkboxes in the table’s left-most column.
- Click the Multi Edit button in the action bar.
- The Multi-Edit Facilities panel will appear, showing all editable fields and their current values.
Multi Edit Interface Breakdown

Instructions:
- The top of the panel provides step-by-step guidance for using the feature:
- Enable the switch for each field you want to update.
- Enter new values for the enabled fields.
- Use the Set NULL switches to clear values where applicable.
- Choose either Safe Submit or Force Submit to apply updates.
- The top of the panel provides step-by-step guidance for using the feature:
Selection Summary:
- Displays the total number of selected facilities.
- Includes a breakdown of the facility types being edited (e.g.,
BAT: 4).
Edit Fields:
- Each editable field (e.g., Facility Name, UWI, Cost Center, etc.) is displayed with the following controls:
- Toggle Switch: Enable the field for editing.
- Input Field: Enter or update the value for the selected field.
- Current Values Indicator: Shows how many different values currently exist for the selected field.
- Each editable field (e.g., Facility Name, UWI, Cost Center, etc.) is displayed with the following controls:
Submission Options
At the bottom of the panel, users can choose how updates are applied:
Safe Submit:
- Ensures that the update is applied only if all selected facilities can be successfully updated.
- If any facility fails to update (e.g., due to a validation error), no changes will be made.
Force Submit:
- Applies updates to facilities individually.
- Facilities with errors are skipped, but successful updates will still be applied.
Additional Actions:
- Reset All: Clears all edits and toggles, restoring the panel to its initial state.
- Cancel: Exits the multi-edit panel without saving any changes.
Use Cases
- Update multiple facilities in the same zone or maintenance profile at once.
- Clear values across selected fields using Set NULL.
- Efficiently adjust details across datasets for bulk corrections or updates.
Columns:
- Customize which columns are visible in the table by selecting or deselecting options from the dropdown menu.
Filters:
- Use the Filters button to refine the table view by applying specific criteria, such as Facility Name, Type, or Zone.
Available Columns for Filtering
You can filter by any of the following columns:
Asset Management:
- ID
- Facility Name
- UWI
- Facility Type
- Cost Center
- Area
- Sub-Area
- Run
- Zone
- Maintenance Profile
- Maintenance Base Date
Reset Widths:
- Revert any column width adjustments to their default settings with one click.
Refresh:
- Reload the table to ensure the data reflects the most recent changes made by you or other users.
- If changes have been made while you’re working, an Out of Sync notification will appear, prompting you to refresh.
Export/Print Options:

- Export the table data in your preferred format:
- Export to Excel: Download the data for detailed analysis or reporting.
- Export to PDF: Save the data in a shareable, non-editable format.
- Print: Generate a printer-friendly version of the data.
- Export the table data in your preferred format:
Was this article helpful?
That’s Great!
Thank you for your feedback
Sorry! We couldn't be helpful
Thank you for your feedback
Feedback sent
We appreciate your effort and will try to fix the article